4 Preliminaries
4.1 The R Language
R is a free programming language and environment where that language can be used. More specifically, R is a statistical programming language, designed for the express and exclusive purpose of conducting statistical analyses and visualizing data. Said differently, R is not a general purpose programming language unlike other languages such as python, Java, C, etc. As such, the language’s real strengths are in the manipulation, analysis, and visualization of data and statistical procedures, though it is often used for other purposes (for example, web applications with RShiny, or writing books like this one with bookdown). You may download R for free from the Comprehensive R Archive Network.
The effective biological analysis practitioner knows how to use multiple tools for their appropriate purposes. The most common programming languages in this field are python, R, and scripting languages like The Bourne Again Shell - bash. While it is beyond the scope of this book to cover which tools are best used where, R is appropriate wherever data analysis and visualization are needed. Any operations that do not involve these aspects (e.g. manipulating text files, programming web servers, etc) are likely more suitable for other languages and software.
4.2 RStudio
This course assumes the learner is using the RStudio software platform for all analyses, unless otherwise noted. RStudio is a freely available and fully featured integrated development environment (IDE) for R, and has many convenient capabilities when learning R. RStudio may be downloaded and installed for free from the site above.
All the examples and instructions in this book assume you have installed R are using RStudio. Be sure to turn off automatic environment saving in RStudio! Because this is so important, here it is again:
By default, RStudio preserves your R environment when you shut it down and restores it when you start it again. This is very bad practice!
The state of your R environment, which includes the values stored in variables, the R packages loaded, etc. from previously executed code is transient and may not reflect the results your code produces when run alone.
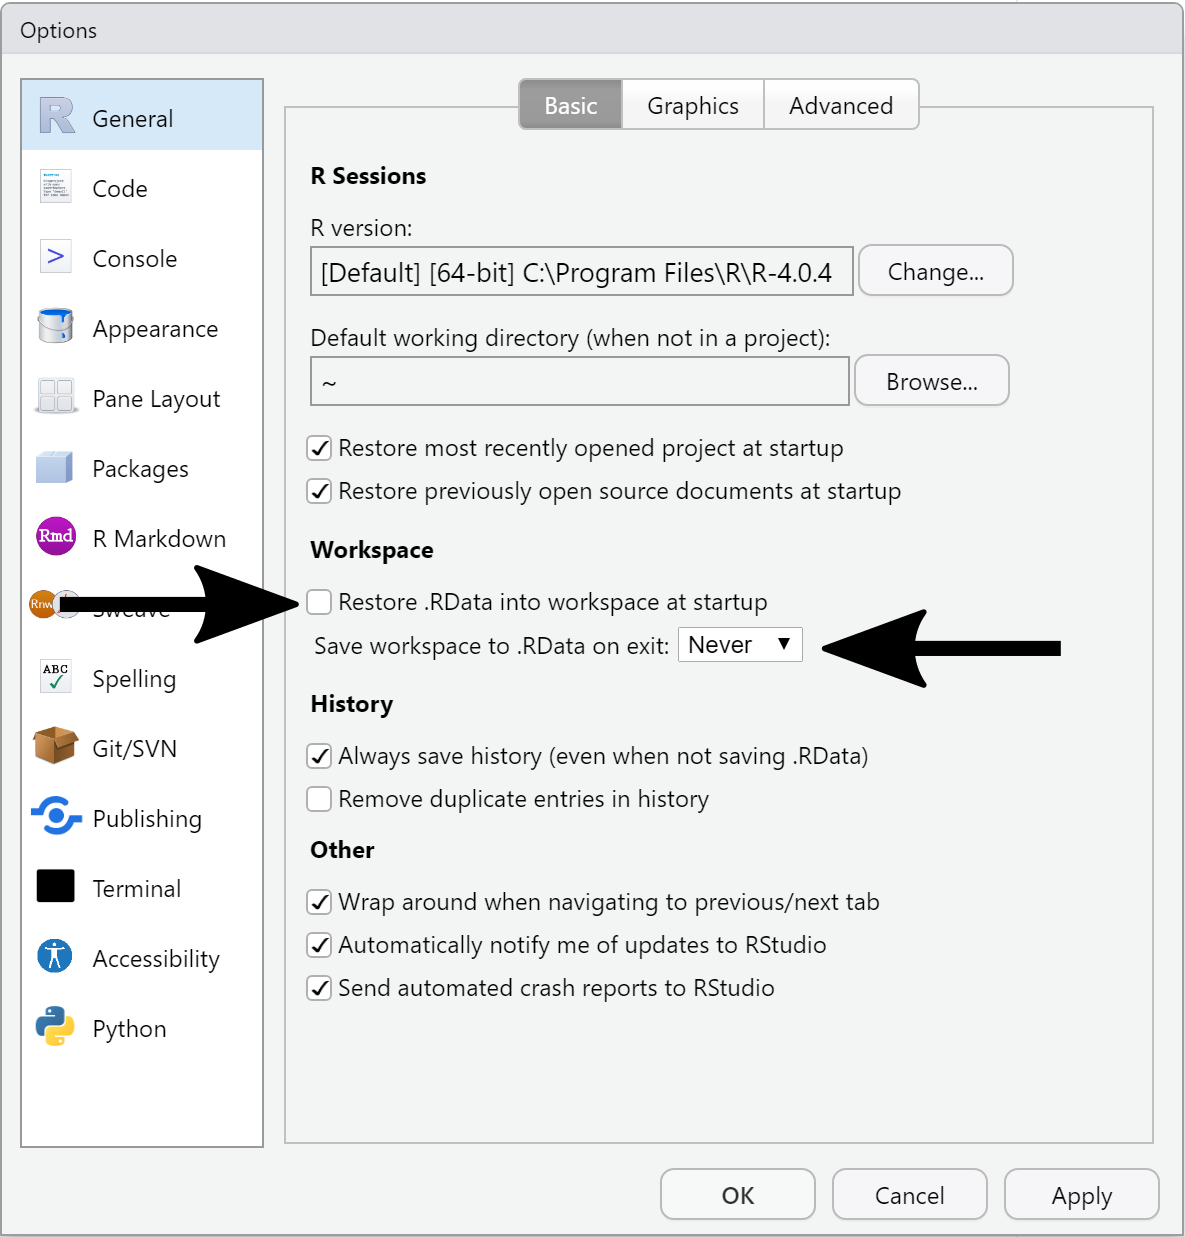
Open the Tools > Global Options… menu and:
- Uncheck “Restore .RData into workspace at startup”
- Set “Save workspace to .RData on exit:” to “Never”
The book R for Data Science has an excellent chapter on why this is a problem and how to change the RStudio setting to avoid it.
- Hands-On Programming with R - Installing R and RStudio
- RStudio Education - Beginners Guide
- ModernDrive R Series - Getting Started
- R for Data Science - What is real, and where does your analysis “live”?
- What They Forgot To Teach You About R - Always start R with a blank slate
- R for Data Science - RStudio
4.3 The R Script
Before we cover the R language itself, we should talk about how you should run your code and where it should live. As mentioned, R is both a programming language and an environment where you can run code written in that language. The environment is a program (confusingly also called R) that allows you to interact with it and run simple lines of code one at a time. This environment is very useful for learning how the language works and troubleshooting, but it is not suitable for recording and running large, complex analyses that require many lines of code. Therefore, all important R code should be written and saved in a file before you run it! The code may not be correct, and the interactive R environment is helpful for debugging and troubleshooting, but as soon as the code works it should be saved to the file and rerun from there.
With this in mind, the basic unit of an R analysis is the R script. An R
script is a file that contains lines of R code that run sequentially as a unit
to complete one or more tasks. Every R script file has a name, which you choose
and should be descriptive but concise about what the script does; script.R,
do_it.R, and
a_script_that_implements_my_very_cool_but_complicated_analysis_and_plots.R
are generally poor names for scripts, whereas analyze_gene_expression.R might
be more suitable.
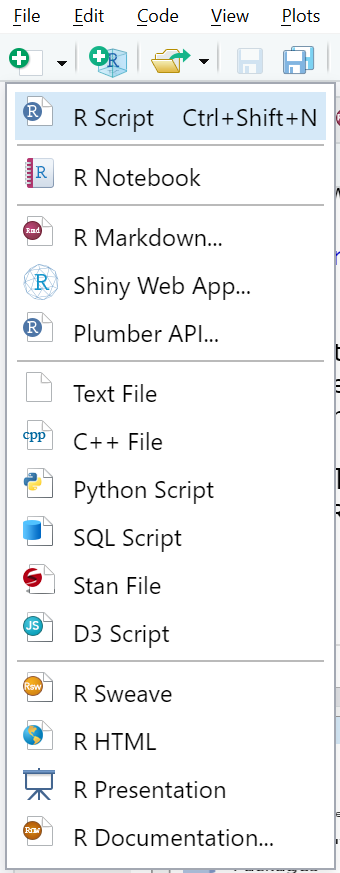
In RStudio, you can create a new script file in the current directory using the
File -> New File -> R Script menu item or the new R Script button at the top
of the screen:
Your RStudio configuration should now enable you to write R code into the (currently unsaved) file in the top left portion of the screen (labeled in the figure as “File Editor”).
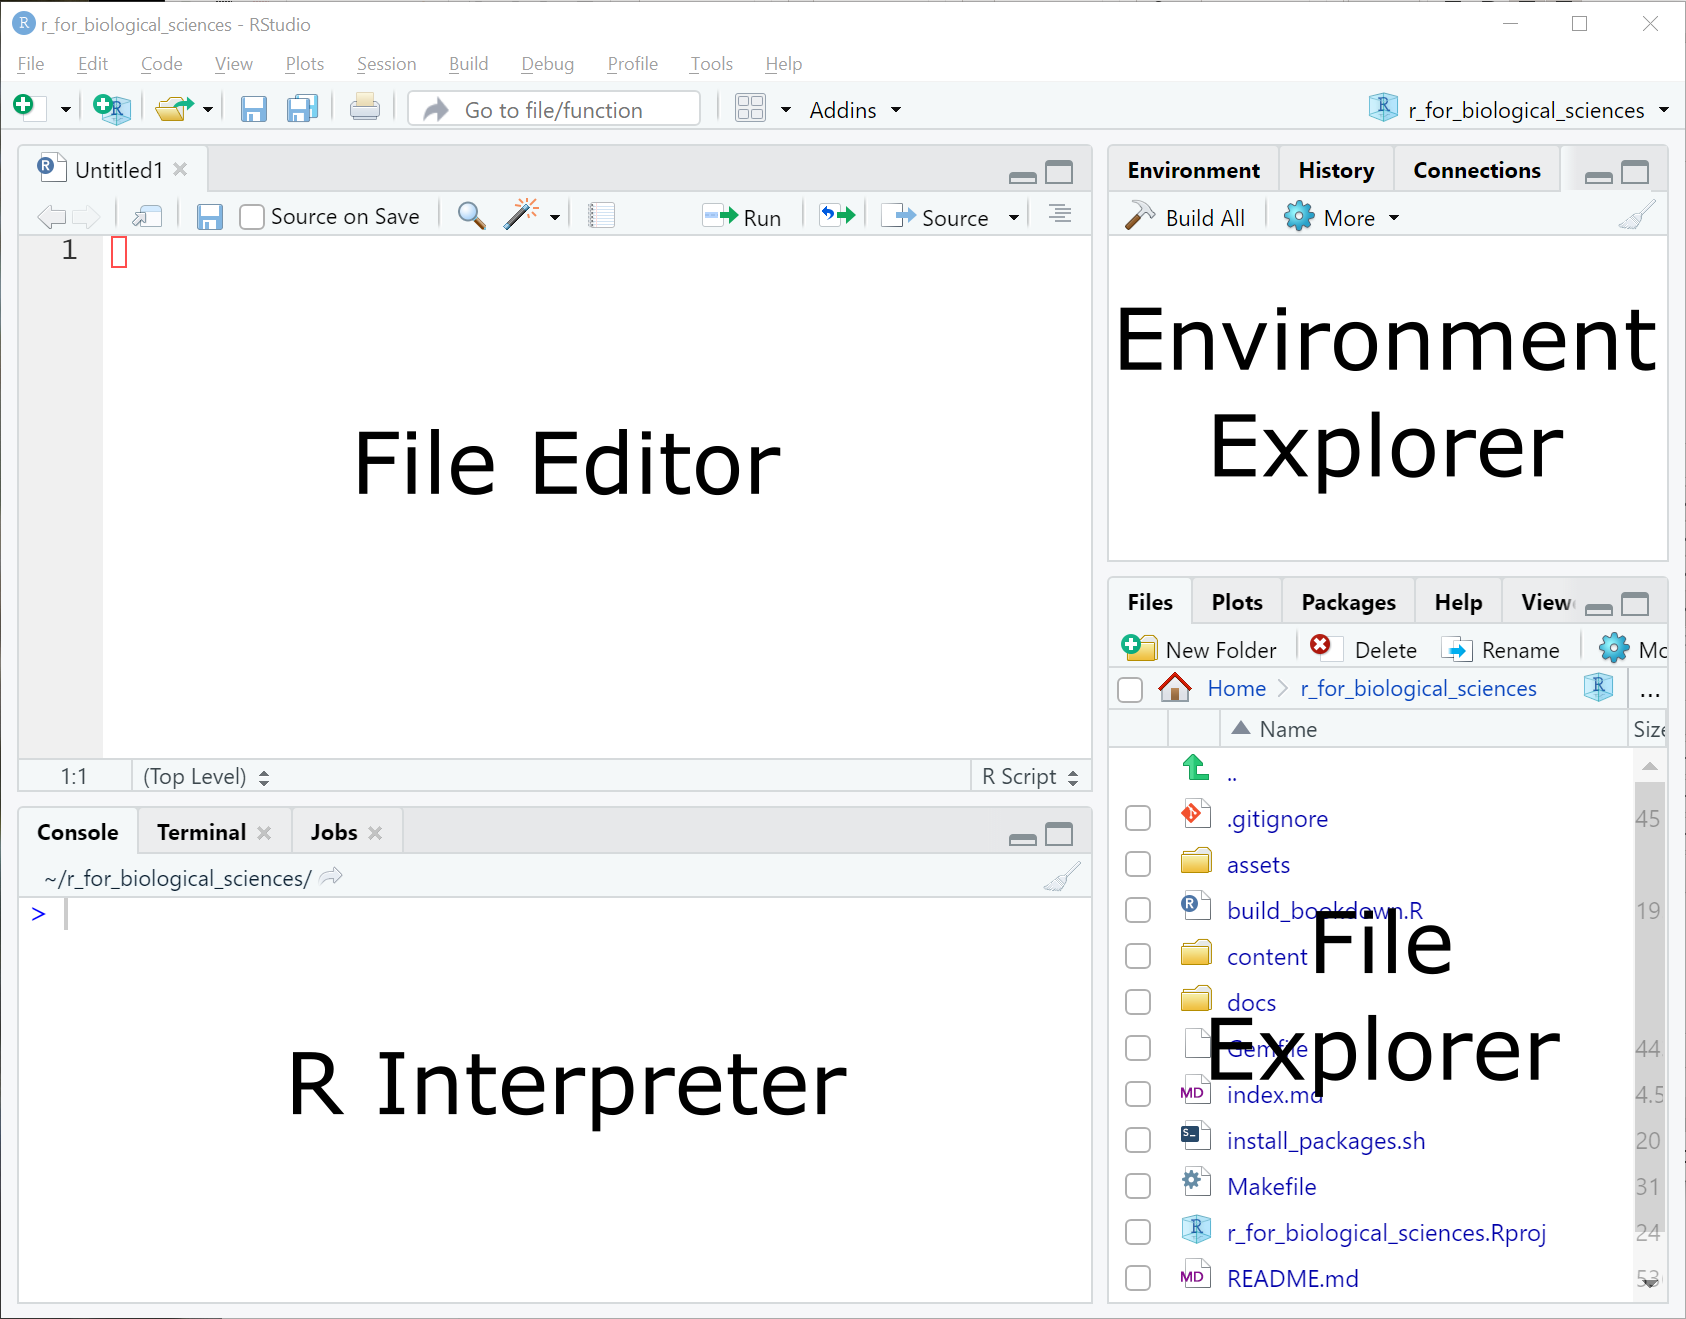
You are now nearly ready to start coding in R!
- How to name files Some useful and advanced tips on how to name files
4.4 The Scripting Workflow
But hold on, we’re still not quite ready to start coding. As mentioned above, all important R code should be written and saved in a file before you run it! Your scripts will very quickly contain many lines of code that are meant to be run in sequential order. While developing your code it is very helpful to run each individual line separately, building up your script incrementally over time. To illustrate how to do this, we will begin with a simple R code that stores the result of an arithmetic expression to a new variable:
# stores the result of 1+1 into a variable named 'a'
a <- 1+1
The concepts in this line of code will be covered in greater depth later, but for now an intuitive understanding will suffice to explain the development workflow in RStudio.
When developing, this is the suggested sequence of operations:
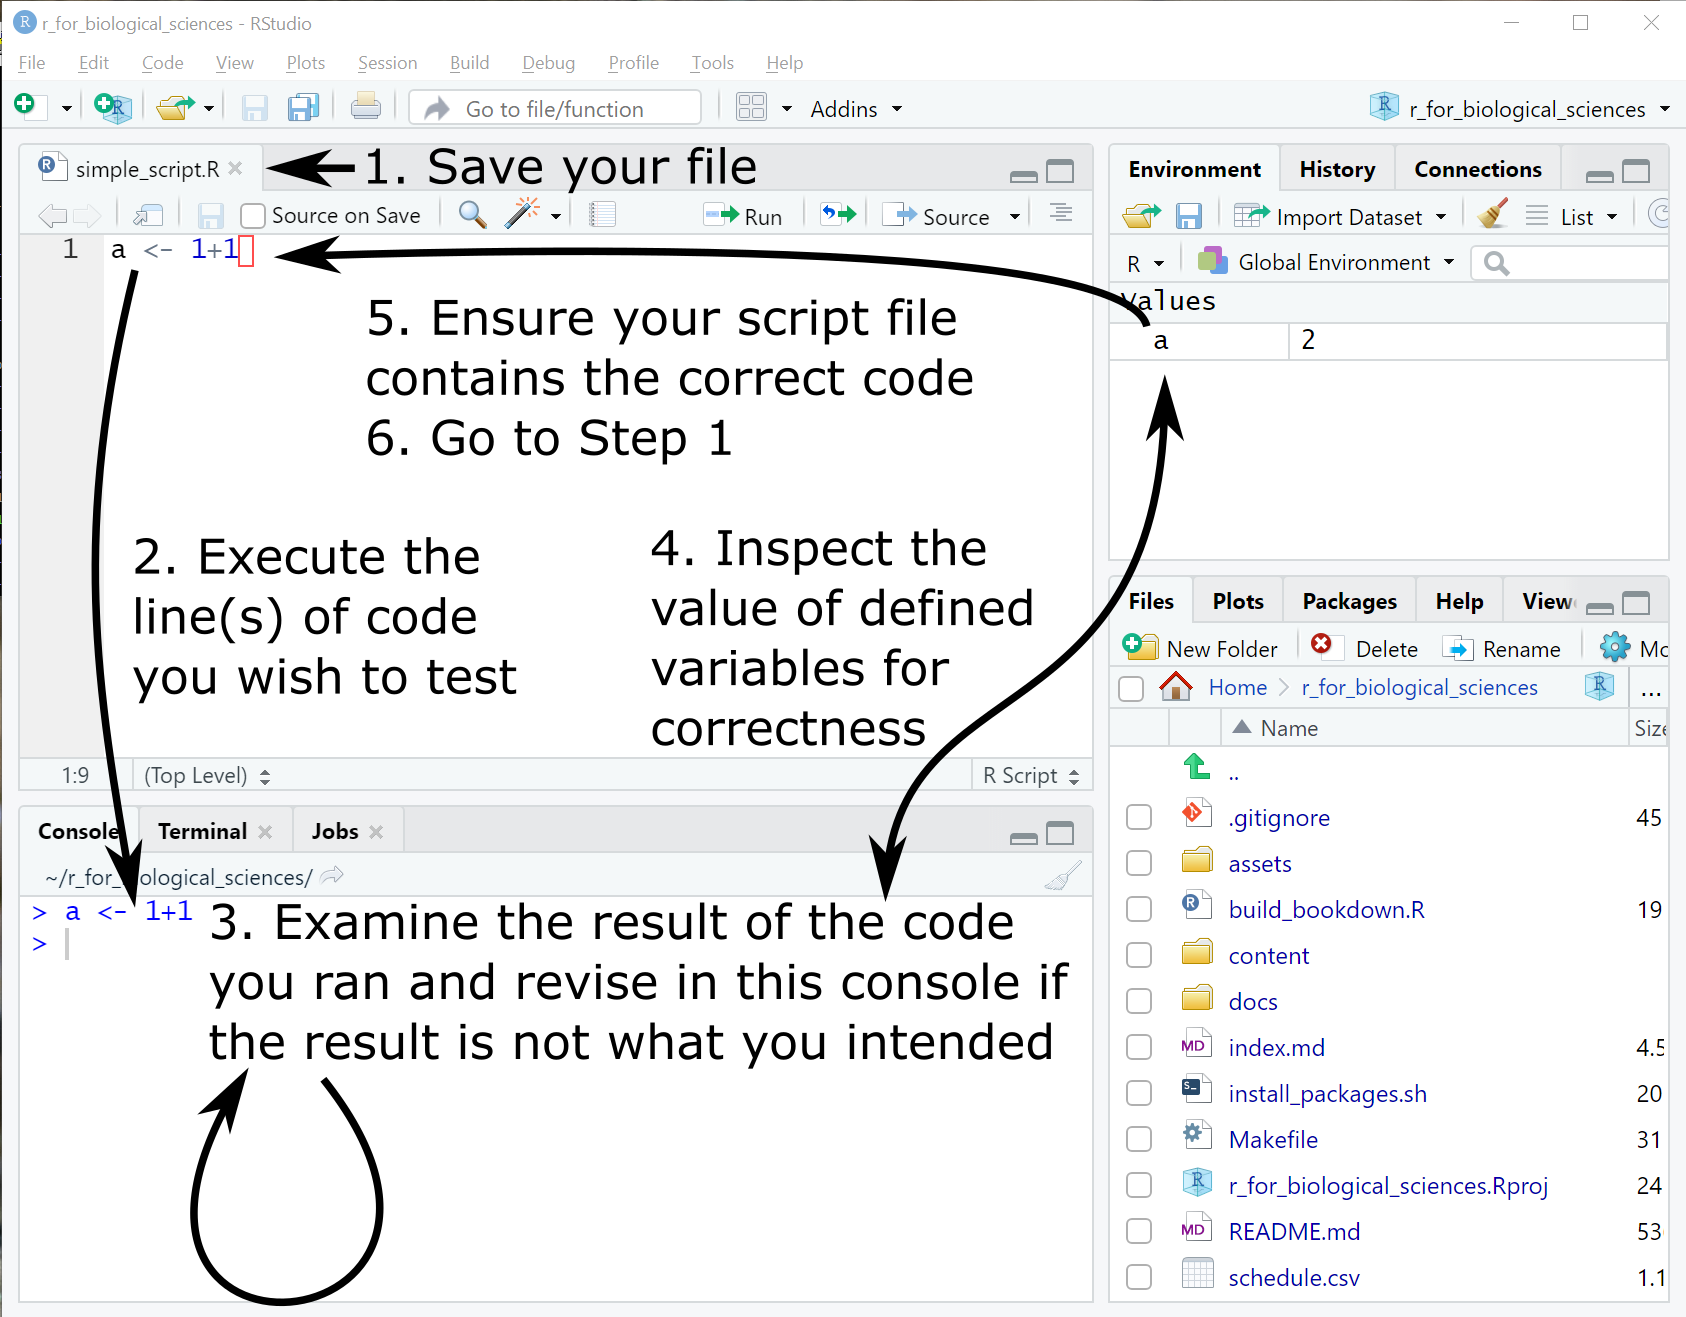
- Save your file (naming if necessary on the first save) with
Ctrl-son Windows orCmd-son Mac - Execute the line or lines of code in your script you wish to evaluate using
Ctrl-Enteron Windows orCmd-Enteron Mac. By default only the line with the cursor is executed; you may click and drag with the mouse to select multiple lines to execute if needed. NB: you can press the up arrow key to recall previously run commands on the console. - The executed code will be evaluated in the Console window, where you may inspect the result and modify the code if necessary.
- You may inspect the definitions of any variables you have declared in the Environment tab at the upper right.
- When you have verified that the code you executed does what you intend, ensure the code in the file you started from is updated appropriately.
- Go to step 1
The above steps are depicted in the following figure:
Over time, you will gain comfort with this workflow and become more flexible with how you use RStudio.
If you followed the instructions above and prevented RStudio from saving your environment when you exit the program (which you should! Did I mention you should?!), none of the results of code you previously ran will be available upon starting a new RStudio session. Although this may seem inconvenient, this is an excellent opportunity to verify that your script in its current state does what you intend for it to do.
It is extremely easy to ask R to do things you don’t mean for it to do!
Rerunning your scripts from the beginning in a new RStudio session is an excellent way to guard against this kind of error. This short page summarizes this very well, you should read it:
- R for Data Science - Workflow: scripts
- RStudio IDE cheatsheet (scroll down the page to find the cheatsheet entitled “RStudio IDE cheatsheet”)
4.5 git + github
4.5.1 Motivation
Biological analysis entails writing code, which changes over time as you develop it, gain insight from your data, and identify new questions and hypotheses. A common pattern when developing scripts is to make copies of older code files to preserve them before making new changes to them. While it is a good idea to maintain a record of all the code you previously ran, over time this practice often leads to disorganized, cluttered, untidy analysis directories.
For example, say you are working on a script named my_R_script.R and decide
you want to add a new analysis that substantially changes the code. You might be
tempted to make a copy of the current version of the code into a new file
named my_R_script_v2.R that you then make changes to, leaving your original
script intact and untouched going forward. You make your changes to your new
script, produce some stunning and fascinating plots, present the analysis at a
group meeting, only to discover later there was a critical bug in your code that
made the plots misleading and requires substantial redevelopment.
Bugs happen. There are two types of bugs:
- Syntax bugs: bugs due to incorrect language usage, which R will tell you about and can (usually) be easily identified and fixed
- Logic bugs: the code you write is syntactically correct, but does something other than what you intend
Bugs are normal. The scenario described above, where you present results only to discover your code wasn’t doing what you thought it was doing, is extremely common and it will happen to you. This is normal, and finding a bug in your code does not mean you are a bad programmer.
Rather than edit your version 2 of your script directly, you decide it is
sensible to copy the file to my_R_script_v2_BAD.R and edit the version 2
script to fix the bug. You are satisfied with your new version 2 script, and so
make a new copy my_R_script_v2_final.R. Upon review of your analysis, you
are asked to implement new changes to the script based on reviewer feedback. You
make a new copy of your script to my_R_script_v2_final_revision.R and make
the requested changes. Perhaps now your script is final, but in your directory
you now have five different versions of your analysis:
my_R_script.R
my_R_script_v2.R
my_R_script_v2_BAD.R
my_R_script_v2_final.R
my_R_script_v2_final_revision.R
When you write your code, you may know which scripts are which, and if you
follow good programming practice and carefully commented your
code you or your successors may be able to sleuth what was done. However, as
time passes, the intimate knowledge you thought you had about your code will be
replaced by other more immediately important things; eventually you may not even
understand or even recognize your own code, let alone someone else trying to
understand it. Not an ideal situation in any case. A better solution involves
recording changes to code over time in such a way that you can recover old code
if needed, but don’t clutter your analytical workspace with unneeded files.
git provides an efficient solution to this problem.
4.5.2 git
git is a free, open source version control software program. Version control software is used to track and record changes to code over time, potentially by many developers working on the same software project concurrently from different parts of the world. The base git software can be used on the command line, or with graphical user interface applications for popular operating systems.
There are many excellent tutorials online (some linked below) that teach how to
use git but the basic concepts are described below. The command line
commands are listed, but the same operations apply in the graphical clients.
- A repository (or repo) is a collection of files in a directory that you
have asked git to track (run
git initin a new directory) - Each file you wish to track must be explicitly added to the repo (run
git add <filename>from within the git repo directory) - When you modify a tracked file, git will notice those differences and show
them to you with
git status - You may tell git to track the changes to the explicit files that changed (also
run
git add <filename>to record changes) - A set of tracked changes is stored in the repo by making a commit.
A commit takes a snapshot of all the tracked files in the repo at the
time the commit is made (run
git commit -c <commit message>with a concise commit message that describes what was done) - Each commit has a date and time associated with it. The files in the repo can be reset to exactly the state they were in at any commit, thus preserving all previous versions of code.
For the vast majority of use cases, the git init, git status, git add, and git commit operations are all you will need to use git
effectively. Two more commands, git push and git pull are needed when
sharing your code with others as described in the next section.
- Official git tutorial videos
- Official git book
- Git Immersion - a guided tour through git commands
- DataCamp - Git for data scientists
4.5.3 Git hosting platforms (GitHub)
The basic git software only works on your local computer with local repositories. To share this code with others, and receive others’ contributions, a copy of the repo must be made available in a centralized location that everyone can access. One such place is github.com, which is a free web application that hosts git repos. bitbucket.org is another popular free git repo hosting service. These two services are practically the same, so we will focus on GitHub.
There is no formal relationship between git and GitHub. git is an open source software project maintained by hundreds of developers around the world (and is hosted on GitHub). GitHub is an independently provided web service and application. The only connection between GitHub and git is that GitHub hosts git repos.
As with git, there are many excellent tutorials on how to use GitHub, but the basic concepts are described below.
- First you must create an account on GitHub if you don’t have one already
- Then, create a new repo on GitHub that you wish to contain your code
The next step depends on whether you have an existing local repo or not:
-
If you do not already have a local git repo: Follow the instructions on
GitHub to
cloneyour GitHub repo and create a local copy that is connected to the one on GitHub - If you already have a local git repo: Follow the instructions on the GitHub to connect your local repo to the GitHub one (this is called “adding a remote”)
Now, your local repo is connected to the same repo on GitHub, and the changes
you make to your local files can be sent, or pushed to the repo on GitHub:
- Make changes to your local files, and
git addandgit committhem as above - Update the remote repo on GitHub by pushing your local commits with
git push - Running
git statuswill indicate whether your local repo is up to date with your remote GitHub repo
When you are working on a team of contributors to a GitHub repo, your local
files will become out of date as others push their changes. To ensure your local
repo is up to date with the GitHub repo, you must pull your changes from
GitHub with git pull.
git was designed to automatically combine changes made to a code base by different developers whenever possible. However, if two people make changes to the same parts of the same file, git may not be able to resolve those changes on its own and the developers must communicate and decide what the code should be. These instances are called merge conflicts and can be challenging to resolve. Dealing with merge conflicts is beyond the scope of this book, but some resources are linked below for further reading.
All the content and code for this book are stored and available on GitHub, as are the assignment code templates.