Lab 03 - Creating a nextflow workflow for multiple samples
Objective
Today we are going to get more experience putting together a bioinformatics pipeline in nextflow. This pipeline will download multiple bacterial genomic sequences, annotate them using Prokka and choose a single gene’s coordinates from the GFF created, make a FASTA index of the genome, and extract out the genomic sequence of the chosen gene.
We will then use a jupyter notebook to generate a quick visualization of the gene annotations in the form of a circos plot.
Small aside - FASTA Indexes
Though the genomes we are working with today are relatively small, it can still be cumbersome to work with such large sequences. For example, let’s say we know that a specific region of the genome should correspond to a specific gene and we want to extract out just that sequence of gene. The most straightforward (and naive) method would be to read through the entire genome until we find that sequence.
While this may finish quickly for smaller genomes, we can take advantage of the regular structure of files and create an index that allows us to more quickly retrieve sequences from a FASTA file by its coordinates. This index contains information about the length of the overall sequence, the position in the file where the sequence begins and the number of characters and bytes per line. This information together can allow us to extract a subsequence from the original by specifying it’s coordinates or range. Importantly, this index prevents us from having to read the file beginning to end. You can think of this as being akin to a table of contents in a book.
This idea can also be extended to the problem of aligning short sequences to a reference sequence. We will need to build a special index (data structure) that allows us to more efficiently find the best alignment of a short read in a much longer sequence. Every alignment algorithm will require you to first build an index that will enable the algorithm to efficiently and more quickly align reads. These indexes are unique to each tool and algorithm and are typically created using a different command provided by the software.
Returning to FASTA indexes, by convention, these indexes are a new file with the .fai extension added directly to the end of the original name. Tools that utilize these indexes expect that the original FASTA and the .fai index are in the same location.
To extract out a random sequence by its location, you will need the original
FASTA, the index file, and the region you want the sequence of in the format of
chr_name:start_pos-end_pos or NC_016845.1:18065-20962. We will extract out
this region by looking at the GFF file of the genomes.
Setup
-
Clone the provided github classroom link
-
As always, remember to load the miniconda module and activate your environment with nextflow installed
-
Notice the new structure of our
main.nf. We have made new scripts for our processes in the modules/ directory and now will have to useincludeto import those processes into ourmain.nfand use them in our workflow.
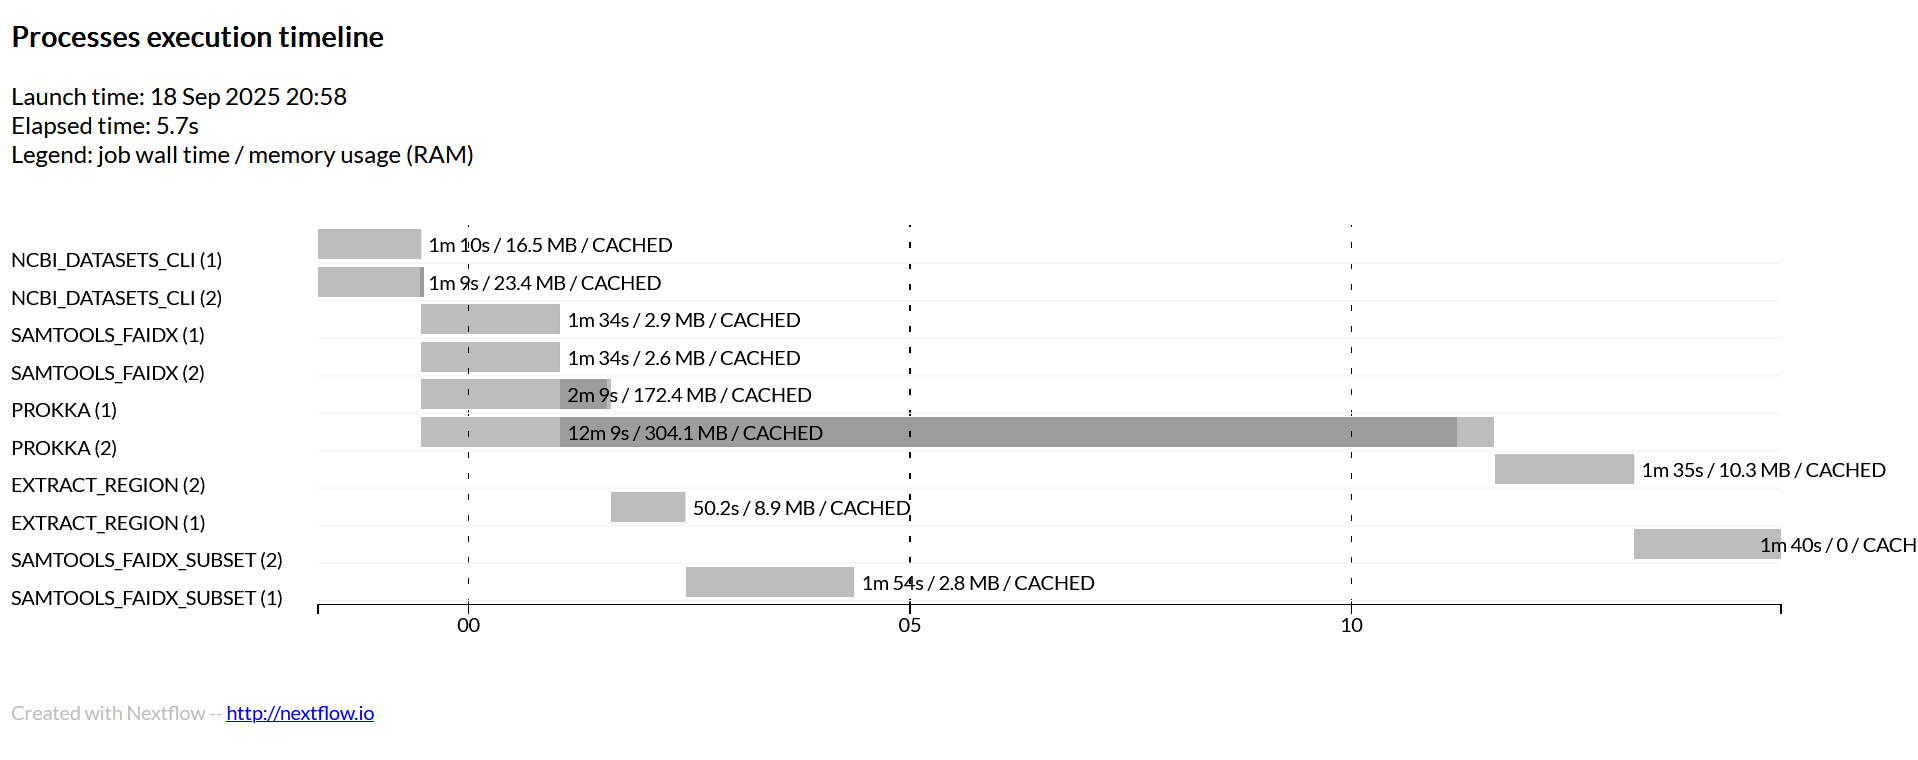
Timeline View of the Workflow
Lab 03 Tasks - Nextflow
Given the description of our workflow and the timeline.html provided in the repo, do your best to fill in both the inputs, outputs, and commands for each process. Remember our goal is to download the bacterial genomes in the CSV, annotate them with Prokka, index the genome and then extract a region of interest out of the genome.
I have given you the outline of each process and will describe to you what the inputs and outputs should look like. Try to figure out how to connect the processes as well as figure out the appropriate commands.
Remember that we can use val in inputs and outputs to specify a value.
We use path to specify files.
Until you are sure your pipeline works end to end, please run it with the following command:
nextflow run main.nf -profile local,conda
Once you are sure it works, you can re-run it by submitting it to the cluster with this command:
nextflow run main.nf -profile cluster,conda -with-report
ncbi_datasets_cli
Input
A tuple containing the name of the bacteria, and the assembly name
Output
A tuple containing the name of the bacteria, and the downloaded FASTA file (.fna)
Script
You can look at the NCBI genomes page for each bacteria for a hint as to the command or look at its documentation.
prokka
Input
A tuple containing the name of the bacteria, and the downloaded FASTA file (.fna)
Output
A tuple containing the name of the bacteria, and the GFF file produced by Prokka
Use emit: gff to name this output gff
Script
Look at the manual page for how to run Prokka. Include the right flags in the prokka command to change the name of the output folder and the output prefix and use the name of the bacteria for both of these flags.
extract_region
Input
A tuple containing the name of the bacteria and the GFF file produced by Prokka
Output
A tuple containing the name of the bacteria and a file called region_of_interest.txt
Script
Look at the provided script in the bin/ and provide the right commands on the CLI to use it. Remember to make the script executable.
samtools_faidx
Input
A tuple containing the name of the bacteria and the downloaded FASTA file (.fna)
Output
A tuple containing the name of the bacteria, the downloaded FASTA file (.fna) and the FASTA index (.fai)
Script
Look at the help page or the documentation for samtools how to generate a FASTA index
samtools_faidx_subset
Input
A tuple containing the name of the bacteria, the downloaded FASTA file (.fna), the
FASTA index (.fai), and the region_of_interest.txt file.
Output
A tuple containing the name of the bacteria and the file named
Script
The command for using samtools to extract a region of sequence is the same as for building the index. Look for flags that change it’s behavior.
Connecting output channels
You’ll notice that in order to run our samtools_faidx_subset process, we need the outputs from different processes. Look through the nextflow operators documentation and find the correct operator that will create the a channel that matches the input channel required by samtools_faidx_subset. You will need to manipulate two output channels into a new channel.
I have given you a script in channel_view/ that you can use to quickly test the correct
operator to use called operator_test.nf.
Workflow
You’ll need to make a starting channel that reads the information from the samplesheet.csv. You will then need to connect the processes with the appropriate inputs and outputs.
channel_view/
You don’t need to use this section if it doesn’t help, but if it does, I have given you a series of nextflow scripts in the channel_view/ directory that you can run to see what the input and output channel will look like for certain processes. Remember, you want to match the inputs and outputs between the correct processes.
You can run these with nextflow run and it will show you what the output channels
should look like (the file names may be slightly different, but the structure and order
will be the same).
Lab03 Tasks - Jupyter Notebooks (Together)
Jupyter notebooks are a convenient environment for bioinformatics analysis. They allow you to intersperse code along with text and figures in the same document. It is very common for many analyses in bioinformatics to be done entirely within a jupyter notebook.
In order for us to utilize these notebooks to their fullest potential, we usually want to make use of different software libraries. We will create a conda environment for our notebooks in a very similar fashion as we have done for every other environment in this class but with a few modifications.
Once we have created this environment, we can open a jupyter notebook in either the same VSCode session or a dedicated JupyterLab session (OnDemand Interactive app). This will allow us to use any software installed in these environments in our notebook.
We will then use the results generated from our pipeline and create a quick visualization of the genome annotations that were created in the form of a circos plot.
New Features
- Nextflow stub run (-stub-run)
- Nextflow report (-with-report)
- Resume (nextflow.config)
- Labels (nextflow.config)
- Jupyter Notebooks and Conda Environments
-stub-run
Now that we are largely running real processes and submitting them
to the cluster, you have likely seen that they can take a fair amount
of time to finish. As you have seen, for nextflow to work correctly,
you will need both the workflow to link the processes together and
the commands in the processes to finish successfully. Since these
processes can take a long time to potentially run, it can be difficult
to figure out if we have constructed the workflow correctly.
Nextflow offers a function called a stub run (-stub-run). This option
you can use when running nextflow will not run any of the commands in
the script, but instead run the commands found in the stub block. If
you look at the processes I have given you, you can see that the stub
block uses commands like mkdir and touch. touch is a linux command
that can be used to create an empty file with a specified name.
If you setup your stub block smartly, you can mimic the outputs that
a process should produce when it finishes running. This will allow you
to test if your workflow logic and channel manipulation is correct without
having to know the correct commands for each tool. touch happens instantaneously
so stub runs will finish in a matter of seconds no matter how complicated
your pipeline is.
For all the modules, I have provided you a working stub block that will
create the right outputs for you to quickly troubleshoot your workflow.
Before you try to figure out the correct commands, you can use the following
command to test if you’ve correctly specified the workflow block:
nextflow run main.nf -profile local,conda -stub-run
-with-report
You can run nextflow with the -with-report option and it will record and
generate a nicely formatted HTML file that shows you how many resources your
jobs utilized, how long they took, and other useful information about your
workflow run. After you have successfully finished the workflow, you can try
to re-run it with -with-report.
Resume
If you look at the last line of the nextflow.config, you can see an option specified
resume = true. When nextflow runs, it caches information about jobs that have successfully
finished. With this option, if your pipeline failed at a later step, nextflow will not re-run
steps that have already finished.
There are times when you want your pipeline to start from the beginning, in which case, you will
want to change this value to resume = false or you can delete the directories in work/ to
force nextflow to re-run everything. You can avoid deleting the conda/ directory in work/ so
nextflow doesn’t have to remake the environments.
Labels
Each process has been given a label that will request a certain amount of resources when
submitted. These labels are a way to ensure that your jobs request the right number of CPUs
or the right amount of memory. We define the resources that are requested by these labels
in the nextflow.config. You’ll notice these are the same options you would specify in a
qsub command.