Basic Git
Git and GitHub
Though sometimes used interchangeably, git and GitHub have no formal relationship and are distinct concepts.
Git is a version control system that allows you to track changes to your code and collaborate with others. Git was developed by Linus Torvalds, the creator of Linux, to track development on the linux kernel as a replacement for another source-control system.
GitHub is a web-based developer platform that allows you to store and manage your git repositories. It is one of the most popular platforms for hosting and sharing open source software.
Git
Generally speaking, git is a way to track your code by recording what changes you’ve made and enabling you to revert to previous versions if needed. By making a codebase into a repository, git will automatically detect when you make changes to your code and allow you to “save” the state of your code at a particular point in time.
This is useful for both iteration and collaboration as you can have no fear altering your codebase when developing and easily share your code with others when you are ready to by directly sharing the repository URL with others.
You can think of this as akin to “saving” a word document, but instead of overwriting your previous document, git will let you keep track of every incremental change as a snapshot.
Git Workflow
The basic workflow for using git is as follows:
- Initialize a git repository
- Stage files to be committed
- Commit changes to the repository
- Push changes to GitHub …
- Pull changes from GitHub
Git has an incredible number of features and capabilities, but the above workflow is the basic process you will use most of the time.
Git Commands
git init
git init will initialize a new git repository in the current directory. On
the backend, this will create a hidden .git directory that contains all the
information needed to track changes to your code. Once you’ve initialized a
directory as a git repository, you will often want to add a remote repository
on GitHub to push your code to. This will keep your version of code in sync with
the version on GitHub. This is how GitHub enables you to collaborate with others
or even yourself on your code.
Typically, you will be initializing your code base as a github repository and then
creating a remote repository on GitHub. After you have run git init, you can
use the GitHub website to create a new repository and follow the instructions
to link your local repository to the remote repository on GitHub.
This process will look something like below assuming you have already created a remote repository on GitHub (it will tell you the remote repository URL to use):
git init
git add <files to be added>
git commit -m "Initial commit"
git branch -M main
git remote add origin <remote_repository_url>
git push -u origin main
This would initialize a new git repository, add all files to the repository, commit the changes, set the remote repository, and push the changes to the remote repository on GitHub. After this, you should be able to see all of your current files on GitHub.
git status
git status will show you the current state of your repo. It will show you
what files have been modified, what files have been staged, and what files
have not been staged. If you’re ever unsure of what’s going on, you can always
run git status to see what’s happening.
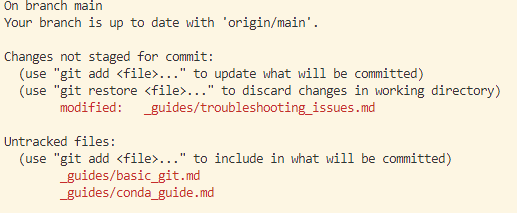
If you look at the above example, I’ll point out a few basic things to note:
- There is a single file (_guides/troubleshooting_issues.md) that has had changes, but has not been staged
- There are two files that are new and not previously tracked (_guides/basic_git.md and _guides/conda_guide.md) that have been created and not staged.
git add
git add will stage files to be committed. In the above example, there are three
files that have changes that have not been recorded since the last commit. A
git add command would stage these files to be committed.
git add _guides/basic_git.md would stage the basic git guide to be committed.
git add _guides/conda_guide.md would stage the conda guide to be committed.
git add _guides/troubleshooting_issues.md would stage the troubleshooting issues guide to be committed.
Although you can use git add <file> to stage individual files, you can also use
git add . to stage all files in the current directory. Use this with caution as it
may stage files you may not have intended.

git commit
git commit will take a snapshot of the currently staged changes and saves them as
a new commit in the history of the repository. Commits are generally considered
the fundamental unit of a git project. They are snapshots or milestones that record
a major or important change in your codebase.
In general, you will be using the git commit -m "<message>" command to commit
your changes. The message should be a succinct description of the changes you’ve
made. You can think of the commit message as akin to commenting in coding. A good
commit message should at minimum enable a third party to understand what changes
you’ve made and potentially why the changes were made.
For example, continuing with the the above example, my git commit may look like:
git commit -m 'added conda and basic git guide, edited troubleshooting'

git push
git push will push your changes or commits to the remote repository. This will
update the remote repository with your changes. At this point in our working
example, our changes are only recorded in our local repository.
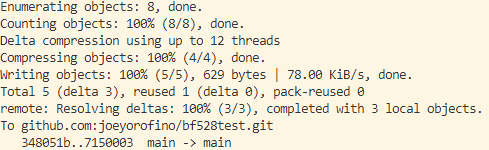
After you’ve pushed to your remote repository, you can view your changes on GitHub by simply navigating to your repository via browser.
git pull
git pull will pull the latest changes from the remote repository to your local
repository. This will update your local repository with the latest changes from
the remote repository.
This is one of the ways in which git enables collaboration. Different users can push their changes to the same remote repository and pull the latest changes from the remote repository made by others.
This is also how you can use GitHub and Git to work on your project in multiple locations while ensuring that you always have the latest version of your code. If you have a GitHub repository, you can clone your repository to a different location and pull the latest changes from the remote repository to keep your local repository up to date.
For example, if you have a GitHub repository on the cluster and you want to work on your project at home, you can clone your repository to your local computer and pull the latest changes from the remote repository to keep your local repository up to date.
git clone
git clone will clone a remote repository to your local machine. This will create a
local copy of the remote repository on your machine. This is useful if you want to
work on your project in multiple locations or if you want to make a backup of your
project.
You can then make changes from any number of locations and push them to your single
remote repository. Using git push and git pull, you can ensure that all locations
are always in sync with the remote repository.
Git and Bioinformatics
We will be using Git and GitHub to manage our code and data for this course. This will become second nature to you and will be an invaluable tool for your future research endeavors. Many publications are now requiring that code and data be stored in a version control system, and Git / Github are the most popular combination of tools for this purpose.
In addition, you can think of Git and GitHub as a more robust way to save your work. Although a side benefit, this can often be a lifesaver when you’re working on a project and something goes wrong or you need to revert to a previous version.
N.B. We will only be using Git and Github to manage code and small files. The git algorithm is not designed to handle large files or data, and attempting to commit and push large files or data to a remote repository can lead to errors. You should only commit code and small files to your remote repository, and use other methods to manage your source data or large files.
.gitignore
A .gitignore is a file located in the root of your repository that tells git which files to ignore. This is useful for ignoring files that you don’t want to commit or push to your remote repository. Git will not track these files or suggest them for staging or committing. Although you will often be provided a .gitignore file by your instructor or by a template, you can also create your own .gitignore file as they are simply text files.
A .gitignore file may look something like this:
# ignore all files in the results directory
results/

# ignore all files ending in .fastq
*.fastq

# ignore system-specific files
.DS_Store
In the above example, we ignore all files in the results directory, all files ending in .fastq, and all system-specific files. You can then add this .gitignore file to your repository and git will ignore the files listed in the .gitignore file. .gitignore files are useful for preventing you from committing and pushing files by accident.